
Resources
Arduino Sketch
Download the complete Arduino sketch used in this project. The code is ready to upload and matches the version demonstrated in the video.
Download Sketch (.ino)The project
Like most of my projects, this one started with a problem that didn’t really need solving.
I use traditional sand timers all the time when I’m working from home. They’re a great way to break work into manageable chunks, and I love how simple they are. There’s no screen to wake up, no app to open and no menus to navigate—you simply flip the timer over and get to work. That simplicity is exactly what makes them so satisfying to use.
The downside is that they’re also incredibly limited. I only own a five-minute and a twenty-minute timer, which doesn’t leave much flexibility depending on what I’m working on. I could buy several more, but I wasn’t particularly keen on filling my desk with an entire collection of hourglasses. They’re also completely silent, which means it’s surprisingly easy to become absorbed in what you’re doing and completely miss the moment the timer finishes.
The sensible solution would have been to buy a digital timer.
Instead, I decided to build one.
Combining the Old with the New
From the very beginning, I knew I didn’t want to build just another countdown timer with a screen. There are already hundreds of those available, and none of them capture the satisfying experience of using a real hourglass.
The goal was to preserve everything that makes a traditional sand timer enjoyable to use while quietly adding some modern conveniences. It still needed to feel intuitive. You should be able to flip it over to start timing, watch the sand gradually fall from one chamber into the other, and know at a glance how much time remains. At the same time, I wanted multiple timer lengths, a rechargeable battery and an audible alert when the countdown finished.
In other words, I wasn’t trying to replace the hourglass—I was trying to modernise it.
Choosing the Hardware
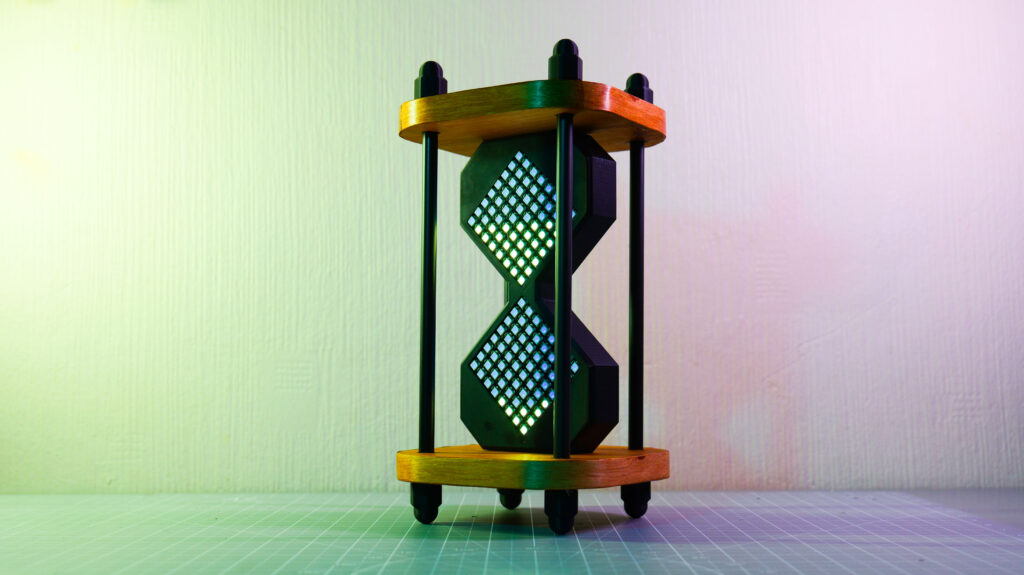
The display consists of two 8×8 addressable LED matrices stacked one above the other. Because every LED can be controlled individually, they were the perfect choice for recreating grains of sand flowing between two chambers.
To make the timer more practical, I added a small buzzer to provide an audible alert once time had run out, along with two capacitive touch buttons that handle selecting the timer length, starting, pausing and resetting the countdown.
At the heart of the project is a Seeed Studio XIAO nRF52840 Sense. Apart from being incredibly compact, it also includes built-in battery charging circuitry, allowing the entire project to run from a rechargeable LiPo battery without adding extra charging hardware.
Its most useful feature, however, is the onboard IMU. This tiny sensor constantly measures orientation, allowing the microcontroller to determine which way is up. That means the hourglass behaves exactly as you’d expect—flip it over, and the sand starts flowing in the opposite direction just like the real thing.
That single feature transformed the project from a digital timer into something that genuinely felt like a digital hourglass.
Proving the Idea
Before spending time designing an enclosure, I wanted to know whether the concept actually worked.
Everything began on a breadboard. The LED matrices were connected together, followed by the touch buttons, buzzer and microcontroller, creating what looked like a fairly typical electronics prototype covered in jumper wires.
Thankfully, the software came together surprisingly well.
Selecting a timer illuminates different rows of LEDs, with each row representing another five minutes. Once started, the LEDs gradually fall from the upper matrix to the lower one, creating the illusion of sand passing through the neck of an hourglass. Pausing causes the display to flash, while reaching the end of the countdown triggers the buzzer so there’s no chance of accidentally working far beyond the intended session.
Watching the first grains of digital sand fall was one of those satisfying moments that makes all the planning worthwhile. It wasn’t particularly pretty, but it proved that the core idea worked.
Designing the Enclosure
With the electronics working, attention turned to designing something that actually looked like an hourglass.
Interestingly, I didn’t have a clear picture of the finished design when I started. The only brief I gave myself was that it should combine traditional materials with modern technology. I wanted it to feel like an object you’d happily leave sitting on a desk rather than another piece of exposed electronics.
To help with the design process, I recreated each component inside Fusion. Some parts were measured using calipers and modelled from scratch, while others were imported from existing CAD files. Having accurate models of every component made it much easier to experiment with different layouts before committing anything to the printer.
Several design iterations later, I finally arrived at an enclosure that balanced the electronics with the proportions of a traditional hourglass.
Building… and Rebuilding
Like most projects, the actual assembly was far less straightforward than I’d hoped.
The wiring itself involved far more soldering than I anticipated, so I built a small perfboard power distribution board to keep everything organised. It seemed like a neat solution until the electronics refused to power up properly.
After plenty of time spent probing around with a multimeter, I eventually discovered that the solder bridges on the perfboard weren’t providing reliable electrical connections. Rebuilding the power rails using a solid length of wire solved the problem completely, but it was another reminder that the smallest details can bring an entire project to a halt.
Not long afterwards I discovered that several wires I’d carefully soldered into place weren’t actually long enough, meaning parts of the build had to be dismantled and redone. In trying to persuade everything to fit together, I even managed to break one of the speakers.
And just when I thought I was finally nearing the finish line, I powered everything on to discover the LED matrices were rotated by ninety degrees, causing the sand to flow sideways instead of vertically. Thankfully, that turned out to be nothing more than a software issue.
The setbacks were frustrating at the time, but they’re also what make projects like this so rewarding. Every problem forces you to learn something new before moving on to the next one.
Adding the Finishing Touches
Although the electronics were finally working, the overall appearance still felt a little too modern. To soften the design, I added wooden accent pieces made from plywood, giving the hourglass a warmer, more traditional feel.
Even these simple additions required a surprising amount of work. The pieces were cut, drilled, reshaped, rounded over and eventually finished with iron-on edge banding to hide the exposed plywood layers. It was my first time using edge banding, and after a little practice I was really pleased with the results.
The supporting rods also went through several redesigns. My original plan involved cutting threads into both ABS and steel rods so they could be secured with matching fixings, but despite several attempts I simply couldn’t produce usable threads. Eventually I abandoned the idea altogether and switched to painted steel rods with friction-fit end caps instead.
It wasn’t the solution I’d originally envisioned, but in hindsight it suited the project far better.
One final software tweak completed the design. Originally, only the LEDs representing the sand were illuminated, leaving the rest of the display completely black. By introducing a subtle background colour for the inactive LEDs, the entire display felt much richer and more complete without distracting from the animation itself.
The Finished Hourglass
The finished timer behaves almost exactly like the object that inspired it. Timer lengths can be selected in five-minute increments using the rear touch controls before the countdown begins. As time passes, the digital sand gradually transfers between the two chambers, creating a visual representation of the remaining time that’s far more satisfying than simply watching numbers count down.
Once the timer finishes, the display changes colour and the buzzer sounds repeatedly until it’s acknowledged. When the battery eventually runs low, a USB-C cable is all that’s needed to recharge it before it’s ready to go again.
Looking at the finished project, it’s hard to believe how many small redesigns and unexpected setbacks happened along the way. Almost every stage required a change of plan, but each problem ultimately led to a better solution than the one I’d started with.
Final Thoughts
More than anything else, this project reminded me that you don’t always need to have every detail figured out before you begin. When I started building this digital hourglass, I had little more than a rough idea and a collection of components sitting on my desk. I certainly didn’t know what the finished product would look like, and I had no idea how many problems I’d have to solve before getting there.
Progress came one step at a time. Every prototype suggested another improvement, every mistake taught me something new, and every redesign moved the project a little closer to the vision I’d had in my head.
That’s one of the things I enjoy most about making. You rarely arrive at the destination by following a perfectly straight path. Instead, you experiment, adapt and learn as you go, and the finished project is usually better because of it.
If you’ve been putting off a project because you don’t have every answer yet, my advice would simply be to start. Take the first step, see where it leads, and trust that you’ll figure out the next one when you get there.